
How to make care labels and size labels for a clothing collection
Put size, fibre composition, care text and origin in columns of your product list, with one row per size. Design the size label and the care label once, and each row fills in its own. This guide covers what the rules ask for in the EU, Norway and the US, and the steps in Cloudlabels from the Excel file to a PDF for your own printer or a label press.
Written by Michael, who builds Cloudlabels · Last updated

Text version of the video
The Design Center in Cloudlabels, zoomed in to 149 %, with the Size Strip 60×20 template. The sheet is Tidewick and the preview item is 1.
The label shows a large S in a black box, then Keelson Hoodie and the colour Black.
The pointer clicks Next item five times, and each click fills the label from another row: L, Keelson Hoodie Care Sample, Navy. One Size, Dockside Tote, Natural. One Size, Stormline Beanie, Signal Red. L, Harbor Merino Tee, Black. M, Keelson Shell Jacket, Signal Orange.
The size, name and colour change on every click. The layout stays the same.
What you need
- A spreadsheet with one row for each variant: one row per style, colour and size.
- Columns for size, fibre composition, care text and country of origin.
- Your care symbols as PNG or JPG files, if you use symbols. Cloudlabels has no built-in care symbols.
- The label size your printer or label press works with, in millimetres.
- A Cloudlabels account. The Free plan is enough to follow along with up to 20 items.
Step by step
Check what the label has to say where you sell
Sew-in labels usually carry three things: fibre composition, care instructions and size, often with a “Made in” line. Which of them the law requires depends on the country. Check the rules for every country you sell in before you design anything.
- EU: Regulation (EU) No 1007/2011 requires the fibre composition on most textile products: the name and percentage by weight of every fibre, highest first, using the fibre names in the regulation's own list. The label must be durable, easily legible and securely attached, in the official language of each country where the product is sold to consumers, unless that country has decided otherwise.
- EU: that regulation does not cover care instructions, size or country of origin. The European Commission notes that some member states make care labelling compulsory in their own law.
- Norway: the EU regulation applies through the EEA, and a Norwegian regulation makes care labelling mandatory on most textile products sold to consumers. The care label must be permanent, for example sewn in.
- US: the FTC's Care Labeling Rule requires care instructions that are attached permanently and stay legible for the useful life of the garment. Other FTC rules require fibre content, country of origin and the identity of the manufacturer, in English.
Set up the spreadsheet: one row per size
A size label belongs to one variant, so a tee in five sizes needs five rows. Composition, care text and origin are usually the same for every size of a style. Repeat them on each row anyway, because every label reads from its own row. The same rows can fill your hang tags later.
- Use a header row with plain column names, such as Style, Colour, Size, Composition, Care and Origin.
- Write the composition the way it should print, for example “80 % cotton, 20 % polyester”: highest percentage first, adding up to 100.
- Write the whole origin line in the cell, for example “Made in Portugal”. The label prints the cell as it stands.
- For more than one country, add a column per language, such as Composition EN and Composition NO, or write both languages in one cell.
Import the file and keep the new columns
In Cloudlabels, open “Items Table” and choose “Import / Export”, then “Import Excel” or “Import CSV”. With an Excel file, “Review column mapping” shows each column in your file next to the column it will land in.
- Columns the table does not have yet, such as Composition, Care and Origin, are listed under “Unmapped columns”. Make sure “Add as new columns” is ticked.
- “Review import” then lists them after “New columns:” and shows how many rows will be added. Nothing is saved until you choose “Approve”.
Start the size label from a template
Open “Labels” and go to the “Templates” tab. Under “Product labels”, the section “Clothing and footwear” has two size labels in millimetres. “Size Strip 60×20” shows a large size, the name and the colour, with no barcode. “Size Sticker 50×80” adds the brand and an EAN-13 or Code 128 barcode. Both are sticker formats, for the garment or its bag. Pick one and choose “Use template”.
- Before you choose it, the list “Your columns” shows which of the template's fields found a column in your table and which say “No column yet”.
- On the label, select a text field, set “Content” to “Dynamic” and pick the column under “Data field”. A field that shows “[Pick a field]” has no column yet.
- On a catalog sheet the two choices under “Content” are called “Fixed text” and “From product”.
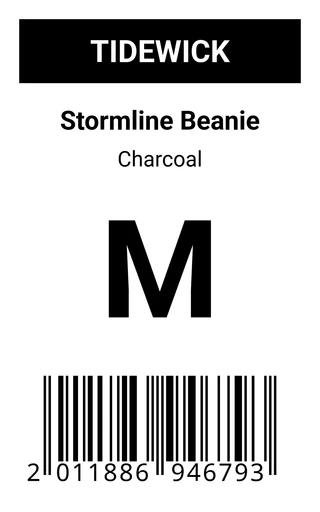
Size Sticker · 50 × 80 mm · EAN-13
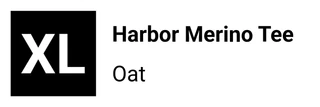
Size Strip · 60 × 20 mm
Made in Cloudlabels with the templates named under each label. Not drawings. Draw the care and composition label at your own size
There is no ready-made care label template, so this one starts blank. The same goes for a size tab that is sewn in. On “My labels”, choose “Design new label”. In the right panel, under “Label”, set “Width (mm)” and “Height (mm)” in the section “Size”. Sizes run from 10 to 500 mm, in whole millimetres.
- Add a “Text” element for the composition, set “Content” to “Dynamic” and pick your Composition column under “Data field”. Do the same for the care text and the origin.
- Under “Long text”, choose “Wrap” so the care text breaks onto new lines inside its box.
- Keep the composition as its own block. The EU regulation asks for it to be shown separately from other information, such as care text.
Add your care symbols as images
Cloudlabels has no built-in care symbols. Add an “Image” element, upload your symbol file, then place and size it on the label. The file is saved in your “Image library”, so “Choose from library” finds it for the next label.
- One image with the whole row of symbols is enough when every garment in the run is washed the same way. For different symbols per garment, set the image's “Content” to “Dynamic” and pick a column under “Image column”. That column holds a web address to the right image for each row.
- The “Symbols” element holds handling marks for shipping, such as “Fragile” and “This way up”. It has no washing symbols.
- GINETEX, the association behind the five care symbols, says they are protected trademarks in most countries and may not be used without a licence agreement. Check this before you print them.
Check the longest rows and save
Step through your products with “Previous item” and “Next item” at the top of the Design Center. Look at the row with the longest composition, such as a four-fibre blend, and the one with the longest care text. With a text field selected, “Check all products” lists the rows where text does not fit its box. Then choose “Save” and give the label a name.
Choose sheet or single labels, then export the PDF
For stickers on A4 or Letter paper, open the “Sheets” tab in the Design Center and turn on “Enable Custom Label Sheet”. “Create New Template” opens the “Sheet library” with Avery and HERMA sheets, or you set up your own. Leave it off for sew-in labels, and the PDF gets one label per page at the label's own size. Go back to “Items Table”, tick the rows, choose your saved label and then “PDF”. In “Generate PDF” you set the print quality, then choose “Export PDF”.
- Cloudlabels does not print on satin or woven ribbon itself. Print the PDF on your own printer, or send it to a label press that prints on the material you want.
- With a label sheet, “Copies per label” offers 1, 2, 3, 5 or 10 copies or a full sheet, for all the rows you ticked. Without a sheet, the PDF has one page per row: set the number of copies in your printer's own dialog, or tell the label press how many you need of each page.
- Pro and Business export at 600 DPI. The Free plan exports at 300 DPI with a small watermark.


Mistakes that cost a reprint
- One row per style instead of one per size.If the sheet has one row for the tee and “S, M, L, XL” in a single cell, every size label prints the same text. Split it into one row per size before you import.
- A composition that does not add up to 100 %.Cloudlabels prints the cell as it stands and does not check the numbers. Go through the column before you import: the percentages add up to 100, the highest comes first, and “100 %” is used only for a single fibre.
- Care text that only fits by shrinking.“Fit to box” under “Long text” scales the text down until it fits, and the panel shows the size it landed on, for example “Auto · 4.5pt”. Print one label at actual size and read it. If it is hard to read, make the label longer.
- Symbols that say something else than the text.When the symbols are one fixed image and the care text comes from a column, a wool jumper can end up with the cotton tee's symbols. Use an image column for the symbols, or save one label per care group.
- Printing the whole run before a wash test.The rules ask for a label that lasts. Print a few, sew one in and wash it the way the label says before you print or order the rest.